HTTPS

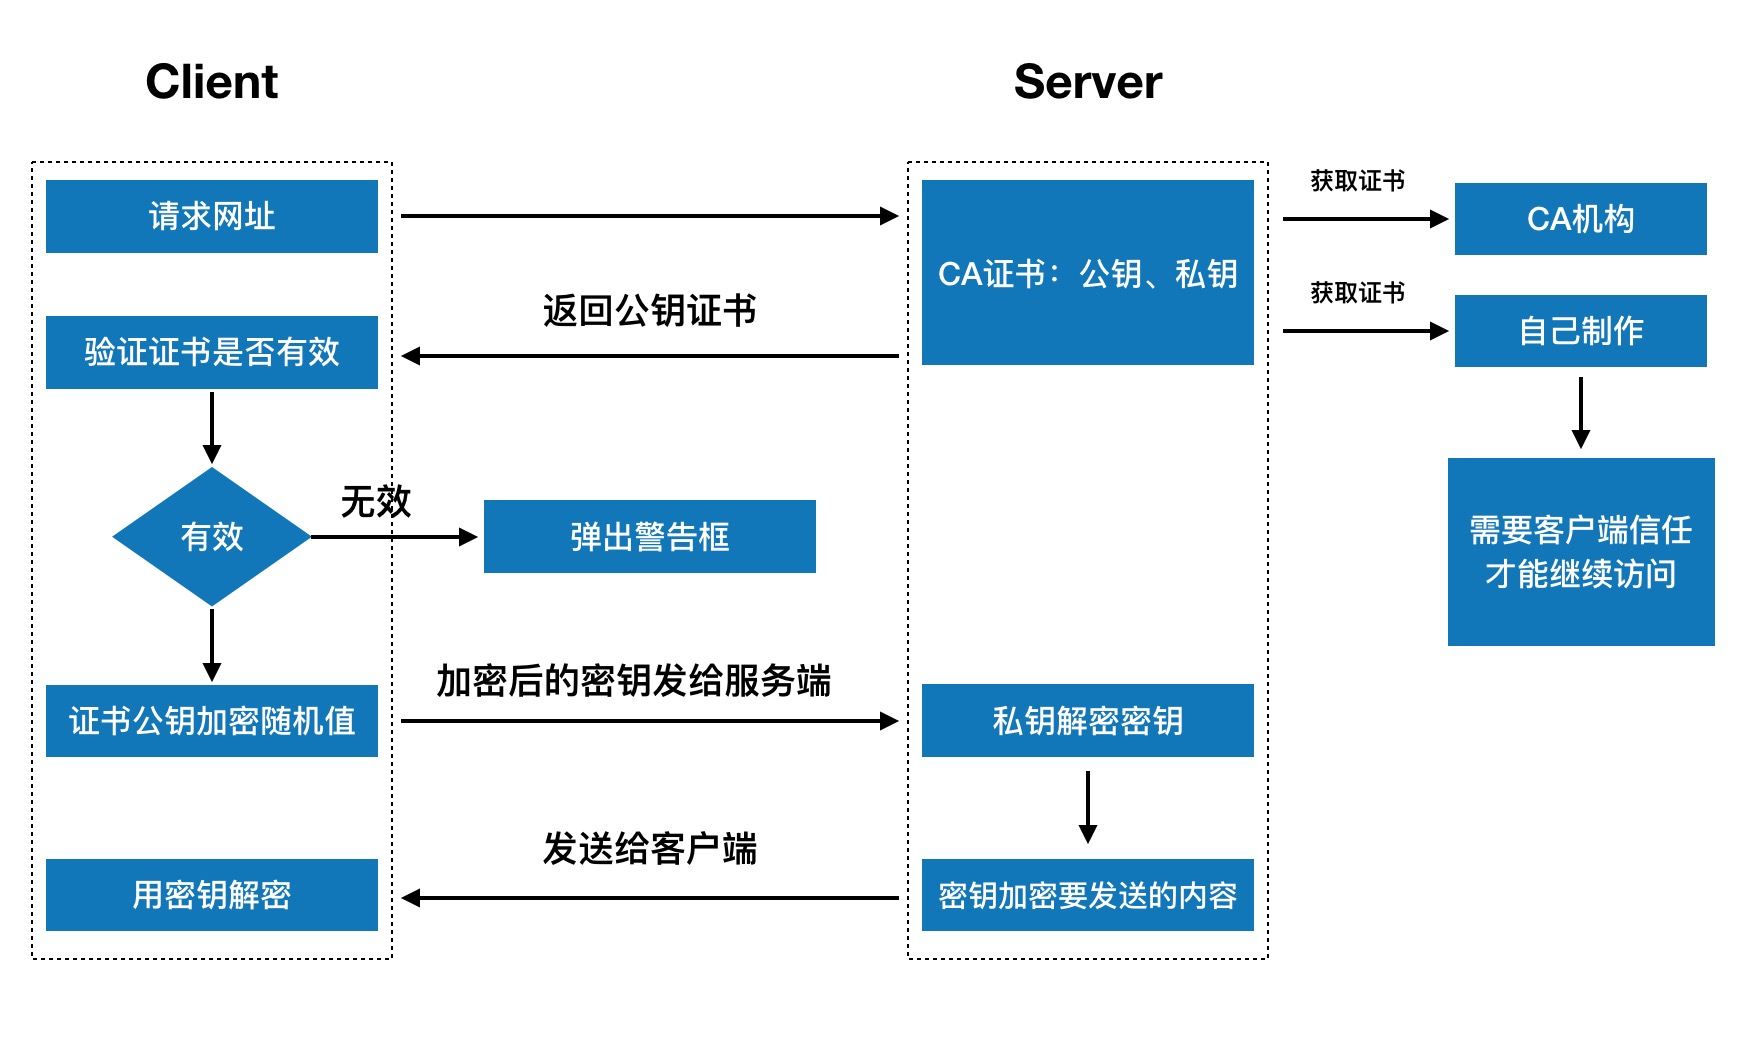
HTTPS是在HTTP和TCP之间插入了一个密码加密层(TLS活SSL)。

HTTPS连接过程

HTTP HTTPS 应用层
TSL or SSL 安全层
TCP TCP 传输层
IP IP 网络层
网络特有的链路接口 网络特有的链路接口 数据链路层
网络物理硬件 网络物理硬件 物理层
HTTPS连接过程

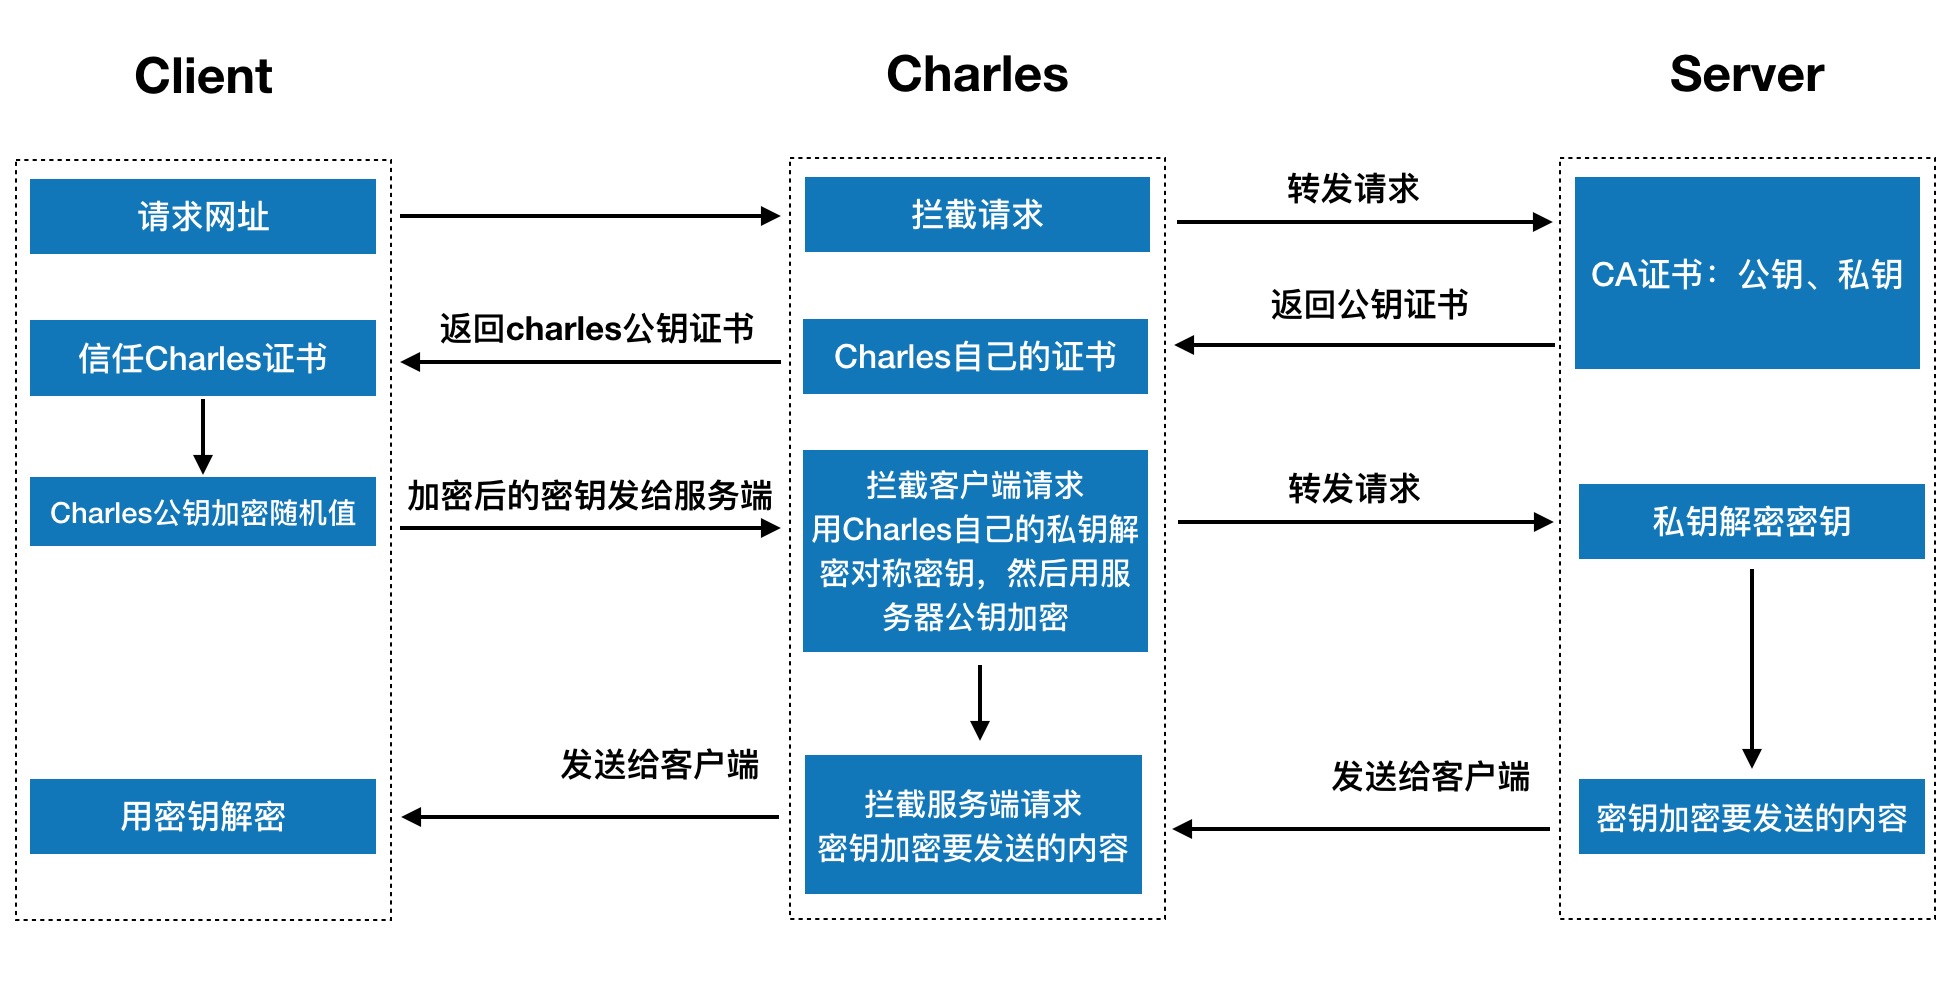
Charles/Fiddler抓包https原理

Charles抓包原理

HTTPS抓包的原理,就是Charles作为中间代理,拿到服务器证书公钥和HTTPS连接的对称密钥,与客户端和服务端进行通信。

Charles抓包的前提是客户端选择信任并安装Charles的CA证书,否则客户端会提示并中止连接,HTTPS还是很安全的。

双向绑定

在新的框架中,通过对数据的监控,发现变化genuine

  • 基于脏检查的双向绑定
    每个双向绑定的元素都有一个watcher
    angular对DOM事件/XHR($http)等事件做了封装,会触发digest的流程,检查所有的watcher
    Angular为Scope模型上设置一个监听队列,用来监听数据变化并更新view。
    当有变量在view(html)上绑定时候,angular就会在$watch队列里面插入一条$watch,用来检查监视的model里是否有变化。
    当浏览器收到特定的事件后,$digest循环就会触发,$digest会遍历所有的$watch
    $digest脏检查最少2次,最多10次,多于10次会抛出异常
1
2
  • 数据劫持:
    vue采用数据劫持结合发布-订阅模式,通过Object.defineProperty来劫持各个属性的setter、getter,在数据变动时发布消息给订阅者,触发响应的监听回调。
    getter/setter的双向绑定
  1. 简单实现方法
    1
    2
    3
    4
    5
    6
    7
    8
    9
    10
    11
    12
    13
    14
    15
    16
    17
    18
    // html
    <input type="text" id="txt">
    <p id="showTxt"></p>
    // js
    var data = {};
    const txtNode = document.getElementById('txt');
    const showTxtNode = document.getElementById('showTxt');
    Object.defineProperty(data, 'txt', {
    set: function (newValue) {
    txtNode.value = newValue;
    showTxtNode.innerHTML = newValue;
    }
    })
    txtNode.addEventListener('keyup', function (e) {
    data.txt = e.target.value
    })

2.数据劫持+发布订阅

1
2
3
4
5
6
7
8
9
10
11
12
13
14
15
16
17
18
19
20
21
22
23
24
25
26
27
28
29
30
31
32
33
34
35
36
37
38
39
40
41
42
43
44
45
46
47
48
49
50
51
52
53
54
55
56
57
58
59
60
61
62
63
64
65
66
67
68
69
70
71
72
73
74
75
76
77
78
79
80
81
82
83
84
85
86
87
88
89
90
91
92
93
94
95
96
97
98
99
100
101
102
103
104
105
106
107
108
109
110
111
112
113
114
115
116
117
118
119
120
121
122
123
124
125
126
127
128
129
130
131
132
133
134
135
136
137
138
139
140
141
142
143
144
145
146
147
148
149
150
151
152
153
154
155
156
157
158
159
160
161
162
163
164
165
166
167
168
169
170
171
172
173
174
175
176
177
178
179
180
181
182
183
184
185
186
187
188
189
190
191
192
193
194
195
196
197
198
199
200
201
202
203
204
205
206
207
208
209
210
211
212
213
214
215
216
217
218
219
220
221
222
223
224
225
226
227
228
229
230
231
232
233
234
235
236
237
238
239
240
241
242
243
244
245
246
247
248
249
250
251
252
253
254
255
256
257
258
259
// html
<div id="app" >
<h2>{{title}}</h2>
<input v-model="name">
<h1>{{name}}</h1>
<button v-on:click="clickMe">click me!</button>
</div>
// js
function Compile(el, vm) {
this.vm = vm;
this.el = document.querySelector(el);
this.fragment = null;
this.init();
}
Compile.prototype = {
init: function () {
if (this.el) {
this.fragment = this.nodeToFragment(this.el);
this.compileElement(this.fragment);
this.el.appendChild(this.fragment);
} else {
console.log('Dom元素不存在');
}
},
nodeToFragment: function (el) {
var fragment = document.createDocumentFragment();
var child = el.firstChild;
while (child) {
// 将Dom元素移入fragment中
fragment.appendChild(child);
child = el.firstChild
}
return fragment;
},
compileElement: function (el) {
var childNodes = el.childNodes;
var self = this;
[].slice.call(childNodes).forEach(function(node) {
var reg = /\{\{(.*)\}\}/;
var text = node.textContent;
if (self.isElementNode(node)) {
self.compile(node);
} else if (self.isTextNode(node) && reg.test(text)) {
self.compileText(node, reg.exec(text)[1]);
}
if (node.childNodes && node.childNodes.length) {
self.compileElement(node);
}
});
},
compile: function(node) {
var nodeAttrs = node.attributes;
var self = this;
Array.prototype.forEach.call(nodeAttrs, function(attr) {
var attrName = attr.name;
if (self.isDirective(attrName)) {
var exp = attr.value;
var dir = attrName.substring(2);
if (self.isEventDirective(dir)) { // 事件指令
self.compileEvent(node, self.vm, exp, dir);
} else { // v-model 指令
self.compileModel(node, self.vm, exp, dir);
}
node.removeAttribute(attrName);
}
});
},
compileText: function(node, exp) {
var self = this;
var initText = this.vm[exp];
this.updateText(node, initText);
new Watcher(this.vm, exp, function (value) {
self.updateText(node, value);
});
},
compileEvent: function (node, vm, exp, dir) {
var eventType = dir.split(':')[1];
var cb = vm.methods && vm.methods[exp];
if (eventType && cb) {
node.addEventListener(eventType, cb.bind(vm), false);
}
},
compileModel: function (node, vm, exp, dir) {
var self = this;
var val = this.vm[exp];
this.modelUpdater(node, val);
new Watcher(this.vm, exp, function (value) {
self.modelUpdater(node, value);
});
node.addEventListener('input', function(e) {
var newValue = e.target.value;
if (val === newValue) {
return;
}
self.vm[exp] = newValue;
val = newValue;
});
},
updateText: function (node, value) {
node.textContent = typeof value == 'undefined' ? '' : value;
},
modelUpdater: function(node, value, oldValue) {
node.value = typeof value == 'undefined' ? '' : value;
},
isDirective: function(attr) {
return attr.indexOf('v-') == 0;
},
isEventDirective: function(dir) {
return dir.indexOf('on:') === 0;
},
isElementNode: function (node) {
return node.nodeType == 1;
},
isTextNode: function(node) {
return node.nodeType == 3;
}
}
function Watcher(vm, exp, cb) {
this.cb = cb;
this.vm = vm;
this.exp = exp;
this.value = this.get(); // 将自己添加到订阅器的操作
}
Watcher.prototype = {
update: function() {
this.run();
},
run: function() {
var value = this.vm.data[this.exp];
var oldVal = this.value;
if (value !== oldVal) {
this.value = value;
this.cb.call(this.vm, value, oldVal);
}
},
get: function() {
Dep.target = this; // 缓存自己
var value = this.vm.data[this.exp] // 强制执行监听器里的get函数
Dep.target = null; // 释放自己
return value;
}
};
function Observer(data) {
this.data = data;
this.walk(data);
}
Observer.prototype = {
walk: function(data) {
var self = this;
Object.keys(data).forEach(function(key) {
self.defineReactive(data, key, data[key]);
});
},
defineReactive: function(data, key, val) {
var dep = new Dep();
var childObj = observe(val);
Object.defineProperty(data, key, {
enumerable: true,
configurable: true,
get: function getter () {
if (Dep.target) {
dep.addSub(Dep.target);
}
return val;
},
set: function setter (newVal) {
if (newVal === val) {
return;
}
val = newVal;
dep.notify();
}
});
}
};
function observe(value, vm) {
if (!value || typeof value !== 'object') {
return;
}
return new Observer(value);
};
function Dep () {
this.subs = [];
}
Dep.prototype = {
addSub: function(sub) {
this.subs.push(sub);
},
notify: function() {
this.subs.forEach(function(sub) {
sub.update();
});
}
};
Dep.target = null;
function SelfVue (options) {
var self = this;
this.data = options.data;
this.methods = options.methods;
Object.keys(this.data).forEach(function(key) {
self.proxyKeys(key);
});
observe(this.data);
new Compile(options.el, this);
options.mounted.call(this); // 所有事情处理好后执行mounted函数
}
SelfVue.prototype = {
proxyKeys: function (key) {
var self = this;
Object.defineProperty(this, key, {
enumerable: false,
configurable: true,
get: function getter () {
return self.data[key];
},
set: function setter (newVal) {
self.data[key] = newVal;
}
});
}
}
new SelfVue({
el: '#app',
data: {
title: 'hello world',
name: 'canfoo'
},
methods: {
clickMe: function () {
this.title = 'hello world';
}
},
mounted: function () {
window.setTimeout(() => {
this.title = '你好';
}, 1000);
}
});
call, apply, bind的区别

call/apply/bind改变函数运行时候的上下文

  • bind 的实现

    1
    2
    3
    4
    5
    6
    7
    Function.prototype.bind = function(obj) {
    var method = this;
    var args = [].slice.call(arguments, 1);
    return function() {
    method.apply(obj, args.concat([].slice.call(arguments)));
    }
    }
  • bind/apply/call的区别
    bind: 只是改变了this指向,没有立即调用
    apply: 传入的参数需要是数组,立即调用
    call: 传入正常的参数,立即调用

  • 使用场景

    1
    2
    3
    4
    5
    6
    7
    8
    9
    10
    11
    12
    13
    14
    var people = {
    sayName: function(age){
    debugger
    console.log(this.name, age);
    }
    };
    var person = {
    name: 'marong'
    }
    people.sayName.call(person, 22);
    people.sayName.bind(person)(22);
    people.sayName.apply(person, [22]);

N个数相加的和为M

1
2
3
4
5
6
7
8
9
10
11
12
13
14
15
16
17
18
19
20
21
22
var combinationSum = function(candidates, target, n) {
if (!candidates || !candidates.length) { return []; }
candidates.sort((a,b) => a - b);
const solutions = [];
const findCombos = function(candIdx, subtotal, solution, n) {
for (let i = candIdx; i < candidates.length; i++) {
console.log(i, candIdx, subtotal, solution, n)
if (subtotal + candidates[i] === target && n == 1) {
solutions.push(solution.concat(candidates[i]));
} else if (subtotal + candidates[i] < target && i + 1 < candidates.length && n > 1) {
findCombos(i + 1, subtotal + candidates[i], solution.concat(candidates[i]), n - 1);
}
// while (candidates[i + 1] === candidates[i]) { i++; }
};
};
findCombos(0, 0, [], n);
return solutions;
};
var result = combinationSum2([1,2,3,3,4,5,6,7,8,9], 6, 3)
console.log('result', result);

define定义模块函数的实现

1
2
3
4
5
6
7
8
9
10
11
12
13
14
15
16
17
18
19
20
21
22
23
24
25
26
27
28
29
30
31
32
33
34
35
36
37
38
39
40
var Amd = (function Manager(){
var modules = {};
function define(name, deps, impl) {
for(var i = 0; i < deps.length; i++) {
deps[i] = modules[deps[i]];
}
modules[name] = impl.apply(impl, deps);
}
function get(name) {
return modules[name];
}
return {
define:define,
get: get,
}
})();
Amd.define('a', [], function(){
function sayName(who) {
return 'Hello ' + who;
}
return {
sayName,
};
});
Amd.define('b', ['a'], function(a) {
var name = 'test';
function sayInfo() {
console.log(a.sayName(name));
}
return {
sayInfo,
}
})
var b = Amd.get('b');
b.sayInfo();

promise

1
2
3
4
5
6
7
8
9
10
11
12
13
14
15
16
17
18
19
20
21
22
23
24
25
26
27
28
29
30
31
32
33
34
35
36
37
38
39
40
41
42
43
44
45
46
47
48
49
50
51
52
53
54
55
56
57
58
59
60
61
62
63
64
65
66
67
68
69
70
71
72
73
74
75
76
77
78
79
80
81
82
83
84
85
86
87
88
89
90
91
92
93
94
95
96
97
98
99
100
101
102
103
104
105
106
107
108
109
110
111
112
113
114
115
116
117
118
119
120
121
122
123
124
125
126
127
128
129
130
131
132
133
134
135
136
137
138
139
140
141
142
143
144
145
146
147
148
149
150
151
152
153
154
155
156
157
158
159
160
161
162
163
164
165
166
167
168
169
170
171
172
173
174
175
176
177
178
179
180
181
182
183
184
185
186
187
function Promise(executor) {
var self = this;
self.status = 'pending';
self.value = undefined;
self.reason = undefined;
self.onFulfilledArr = [];
self.onRejectedArr = [];
function resolve(value) {
if (self.status === 'pending') {
self.value = value;
self.status = 'fulfilled';
self.onFulfilledArr.forEach(function(fn) {
fn(self.value);
})
}
}
function reject(resaon) {
if (self.status === 'pending') {
self.reason= resaon;
self.status = 'rejected';
self.onRejectedArr.forEach(function(fn) {
fn(self.reason);
})
}
}
try {
executor(resolve, reject);
} catch(err) {
reject(err);
}
};
function resolvePromise(Promise2, x, resolve, reject) {
if (Promise2 === x) {
reject(new TypeError('循环引用'))
}
let called;
if ( x !== null && (typeof x === 'function' || typeof x === 'object')) {
let then = x.then;
try {
if (typeof then === 'function') {
then.call(x, function(y){
if (called) return;
called = true;
resolvePromise(Promise2, y, resolve, reject);
}, function(err) {
if (called) return;
called = true;
reject(err);
})
} else {
resolve(then);
}
}catch(err) {
if (called) return;
called = true;
if (called) return;
reject(err);
}
} else {
resolve(x);
}
}
Promise.prototype.then = function(onfulfilled, onrejected) {
onfulfilled = typeof onfulfilled === 'function' ? onfulfilled : function(value) { return value};
onrejected = typeof onrejected === 'function' ? onrejected : function(reason) { return reason};
var self = this;
var Promise2;
if (self.status == 'fulfilled') {
return Promise2 = new Promise(function(resolve, reject) {
try {
let x = onfulfilled(self.value);
resolvePromise(Promise2,x, resolve, reject);
// resolve(x);
} catch(err) {
reject(e);
}
})
}
if(self.status === 'rejected') {
return Promise2 = new Promise(function(resolve, reject) {
try {
let x = onrejected(self.reason);
resolvePromise(Promise2,x, resolve, reject);
} catch(err) {
reject(e);
}
});
}
if(self.status === 'pending') {
return Promise2 = new Promise(function(resolve, reject) {
self.onFulfilledArr.push(function() {
try {
let x = onfulfilled(self.value);
resolvePromise(Promise2,x, resolve, reject);
} catch(err) {
reject(err);
}
});
self.onRejectedArr.push(function() {
try {
let x = onrejected(self.reason);
resolvePromise(Promise2,x, resolve, reject);
} catch(err) {
reject(err);
}
});
});
}
}
Promise.prototype.catch = function(cb) {
return this.then(null, cb);
}
Promise.resolve = function(value) {
return new Promise(function(resolve, reject){
resolve(value);
})
}
Promise.reject = function(reason) {
return new Promise(function(resolve, reject) {
reject(reason);
});
}
Promise.all = function(promises) {
if(Array.isArray(promises)) {
throw new TypeError('The parameters of the promise method must be an Array');
}
return new Promise(function(resove, reject) {
try{
let arr = [];
let count = 0;
for (let i = 0; i < promises.length; i++) {
promises[i].then(function(y) {
arr[i] = y;
count++;
if (count === promises.length) {
resolve(arr);
}
}, reject);
};
} catch(err) {
reject(err);
}
});
}
Promise.race = function(promises) {
return new Promise(function(resolve, reject) {
for(let i = 0; i < promises.length; i++) {
promises[i].then(resolve, reject);
}
})
}
var p = new Promise(function(resolve, reject){
setTimeout(function() {
resolve(200);
}, 200);
})
p.then(function(result){
console.log('success1', result);
return new Promise(function(resolve, reject) {
resolve(800);
});
}, function(reason) {
console.log('failed1', reason);
return reason;
}).then().then(function(result){
console.log('success2', result);
}, function(reason){
console.log('failed2', reason);
})

eventlop

  • JS是单线程,虽然有web-worker多线程出现,但也是在主线程的控制下,web-worker仅仅能计算任务,不能操作dom,所以本质上还是单线程.
    单线程的任务是串行的,后一个任务需要等待前一个任务的执行,这就可能出现长时间的等待,但由于类似ajax网络请求,setTimeout时间延迟、DOM事件的用户交互等,这些任务并不消耗CPU,是一种空等,浪费资源,因此出现了异步。通过将任务交给相应的异步模块去处理,主线程的效率大大提升,可以并行的去处理其它的操作。当异步处理完成,主线程空闲时,主线程读取响应的callback,进行后续的操作,最大程度的利用CPU。此时出现了同步和异步执行的概念,同步执行是主线程按照顺序,串行执行任务;异步执行就是cpu跳过等待,先处理后续的任务(CPU, 与网络模块、timer等并行进行任务).因此产生了任务队列与事件循环,来协调主线程与异步模块之前的工作。
  • 不同任务队列之间,存在着优先级,优先级高的先获取。
    任务队列有两种类型,一种是microtask queue, 另一种是macrotask queue。
    microtask queue:
    唯一,整个事件循环中,仅存在一个;执行为同步,同一个事件循环中的microtask会按队列顺序,串行执行完毕;process.nextTick, Promise, Object.observer, MutationObserver
    macrotask queue:
    不唯一,存在一定的优先级(用户I/O部分优先级更高);异步执行,同一个事件循环中,只执行一个。setTimeout setInterval,setImmediate, I/O, UI rendering

  • 事件循环流程:
    主线程读取JS代码,此时为同步环境,形成相应的堆和执行栈
    主线程遇到异步任务,制定给对应的异步进程进行处理
    异步进程处理完毕(ajax返回, DOM事件,timer), 将相应的异步任务推入任务队列
    主线程查询任务队列, 执行microtask(微任务) queue, 将其按顺序执行,全部执行完毕
    主线程查询任务队列,执行macrotask(宏任务) queue, 取队首任务执行,执行完毕。
    重复查询任务队列
    microtask queue中的所有callback处在同一个事件循环中,而macrotask queue中的callback有自己的事件循环
    同步环境执行 -> 事件循环1(microtask queue all) -> 事件循环2(macrotask queue中的一个) -> 事件循环1(microtask queue all)
    -> 事件循环2(macrotask queue中的一个)

1
2
3
4
5
6
7
8
9
10
11
12
13
14
15
16
17
18
19
console.log('1, time = ' + new Date().toString())
setTimeout(macroCallback, 0);
new Promise(function(resolve, reject) {
console.log('2, time = ' + new Date().toString())
resolve();
console.log('3, time = ' + new Date().toString())
}).then(microCallback);
function macroCallback() {
console.log('4, time = ' + new Date().toString())
}
function microCallback() {
console.log('5, time = ' + new Date().toString())
}
// 执行结果:
同步执行:1,2,3
事件循环1(micro callback): 5
事件循环2(macro callback): 4

async function async1() {
console.log(“async1 start”);
await async2();
console.log(“async1 end”);
}
async function async2() {
console.log( ‘async2’);
}
console.log(“script start”);
setTimeout(function () {
console.log(“settimeout”);
},0);
async1();
new Promise(function (resolve) {
console.log(“promise1”);
resolve();
}).then(function () {
console.log(“promise2”);
});
console.log(‘script end’);

```
script start
async1 start
async2
promise1
script end
promise2
async1 end
undefined
setTimeout

async 表达式的返回值
await表达式的作用和返回值

await是一个让出线程的标志,await后面的函数会先执行一遍, 然后就会跳出整个async函数来执行后面的js代码
等本轮事件循环执行完了之后,又会跳回到async函数中等待await
后面表达式的返回值,如果返回值为非Promise则继续执行async函数后面的代码,否则将返回promise放入队列中

stackQueue

栈是一种特殊的列表,栈内的元素只能通过栈顶访问, 是一种后入先出(LIFO, last-in-first-out)的数据结构, 例如摞盘子就是常见的栈的列子。

队列

队列是一种特殊的列表,只能在队尾插入元素,在对首删除元素,是一种先进先出(FIFO, first-in-first-out)的数据结构。

用栈实现队列

思路:
入队:将元素压入栈1
出队:如果栈2 为空,将栈1倒(pop)入(push)栈2, 栈2出栈(pop);
如果栈2 不为空, 栈2 出栈;

1
2
3
4
5
6
7
8
9
10
11
12
13
14
15
16
17
18
19
20
21
22
23
24
25
26
27
28
29
30
31
32
33
34
35
36
37
38
39
40
41
42
43
44
45
46
function Stack() {
this.dataStore = [];
this.push = function(item) {
this.dataStore.push(item);
return this.dataStore;
};
this.pop = function() {
return this.dataStore.pop();
};
this.length = function() {
return this.dataStore.length;
}
};
function Queue() {
var stack1 = new Stack();
var stack2 = new Stack();
this.enqueue= function(item) {
return stack1.push(item);
};
this.dequeue = function() {
if(!stack1.length() && !stack2.length()){
throw new Error("Queue is empty");
}
if(!stack2.length()) {
while(stack1.length()) {
stack2.push(stack1.pop());
}
}
return stack2.pop();
};
};
var queue = new Queue();
console.log(queue.enqueue(2))
console.log(queue.enqueue(4))
console.log(queue.enqueue(6))
console.log(queue.dequeue())
console.log(queue.enqueue(8))
console.log(queue.enqueue(10))
console.log(queue.dequeue())

用队列实现栈

要实现的功能,一个数组,后进先出,也就是只能用push,shift来实现push, pop功能
思路:
进栈:将元素插入当前有值的队列
出栈:将当前有值的队列,将该队列中除最后一个元素的全部元素依次出队,返回该对的最后一个元素。

1
2
3
4
5
6
7
8
9
10
11
12
13
14
15
16
17
18
19
20
21
22
23
24
25
26
27
28
29
30
31
32
33
34
35
36
37
38
39
40
41
42
43
44
45
46
47
48
function Queue() {
this.dataStore = [];
this.enqueue = function(item) {
this.dataStore.push(item);
return this.dataStore;
}
this.dequeue = function() {
return this.dataStore.shift();
}
this.length = function() {
return this.dataStore.length;
}
}
function Stack() {
var queue1 = new Queue();
var queue2 = new Queue();
this.push = function(item){
let curQueue = queue1;
curQueue = !!queue2.length() ? queue2 : queue1;
return curQueue.enqueue(item);
}
this.pop = function(){
if(!queue1.length() && !queue2.length()) {
throw new Error('Stack is Empty');
}
const curQueue = !!queue1.length() ? queue1 : queue2;
const tmpQueue = curQueue === queue1 ? queue2 : queue1;
while(curQueue.length() > 1) {
tmpQueue.enqueue(curQueue.dequeue());
}
return curQueue.dequeue();
}
}
var stack = new Stack();
console.log(stack.push(2));
console.log(stack.push(4));
console.log(stack.push(6));
console.log(stack.pop());
console.log(stack.push(8));
console.log(stack.push(10));
console.log(stack.pop());

throttle-debounce

  • throttle(节流): 设置一个阈值,在阈值内,把触发的事件合并成一次执行,当达到阈值,必行执行
  • debounce(去抖动): 把触发非常频繁的事件合并成一次执行

throttle

方法一:时间戳

利用本次执行的时间与上次执行的时间相比较
特点:先执行目标函数,后等待规定的时间段, 一般首次都会触发, 最后一次如果时间不满,不会触发

1
2
3
4
5
6
7
8
9
10
function throttle(fn, delay) {
let startTime = +new Date;
return function() {
const curTime = +new Date();
if (curTime - startTime >= delay) {
fn.apply(this.arguments);
startTime = curTime;
}
};
}

方法二:定时器

利用定时器实现时间间隔
特点:先等待够规定时间,再执行,即停止触发后,若定时器已经在任务队列里注册了目标函数,它也会执行最后一次。首次不会触发

1
2
3
4
5
6
7
8
9
10
11
12
13
function throttle(fn, wait) {
var time, context;
return function() {
context = this;
if(!time) {
time = setTimeout(function() {
fn.apply(context, arguments);
time = null;
}, wait);
}
}
}

方法三:时间戳+定时器

1
2
3
4
5
6
7
8
9
10
11
12
13
14
15
16
17
18
19
20
21
function throttle(func, wait) {
let previous = 0;
let context, args, time, remaining;
return function() {
let now = +new Date();
context = this;
args = arguments;
remaining = wait - (now - previous);
if (remaining <= 0) {
func.apply(context, args);
previous = now;
} else {
if (time) clearTimeout(time);
time = setTimeout(function() {
func.apply(context, args);
time = null;
previous = +new Date();
}, remaining);
}
}
};

方法四:underscore的实现方法

通过leading, trailing对首尾是否调用
leading:false 表示禁用第一次执行
trailing: false 表示禁用停止触发的回调

1
2
3
4
5
6
7
8
9
10
11
12
13
14
15
16
17
18
19
20
21
22
23
24
25
26
27
28
29
30
31
32
33
34
35
36
37
38
39
40
const throttle = function(func, wait, options) {
var timeout, context, args, result;
var previous = 0;
if (!options) options = {};
var later = function() {
previous = options.leading === false ? 0 : +new Date;
timeout = null;
result = func.apply(context, args);
if (!timeout) context = args = null;
};
var throttled = function() {
var now = +new Date();
if (!previous && options.leading === false) previous = now;
var remaining = wait - (now - previous);
context = this;
args = arguments;
if (remaining <= 0 || remaining > wait) {
if (timeout) {
clearTimeout(timeout);
timeout = null;
}
previous = now;
result = func.apply(context, args);
if (!timeout) context = args = null;
} else if (!timeout && options.trailing !== false) {
timeout = setTimeout(later, remaining);
}
return result;
};
throttled.cancel = function() {
clearTimeout(timeout);
previous = 0;
timeout = context = args = null;
};
return throttled;
};

适用场景

频繁触发时间,且在一定时间内需要执行

  1. 鼠标移动,
  2. 窗口滚动

debounce

###代码

1
2
3
4
5
6
7
8
9
10
11
function debounce(func, wait) {
var timeout;
return function() {
let context = this, args = arguments;
clearTimeout(timeout);
timeout = setTimeout(function() {
func.apply(context, args);
}, wait);
};
}

有时候希望能实现 在一个周期内第一次触发,就立即执行一次,然后一定时间段内都不能再执行目标函数
优化后:

1
2
3
4
5
6
7
8
9
10
11
12
13
14
15
16
17
18
19
20
21
22
23
24
25
26
27
28
29
var debounce = function(func, wait, immediate) {
var timeout, args, context, timestamp, result;
var later = function() {
var last = +new Date() - timestamp;
if (last < wait && last >= 0) {
timeout = setTimeout(later, wait - last);
} else {
timeout = null;
if (!immediate) {
result = func.apply(context, args);
if (!timeout) context = args = null;
}
}
};
return function() {
context = this;
args = arguments;
timestamp = +new Date();
var callNow = immediate && !timeout;
if (!timeout) timeout = setTimeout(later, wait);
if (callNow) {
result = func.apply(context, args);
context = args = null;
}
return result;
};
};

如果immediate为true的话,立刻调用,然后wait内不可以再次调用,
可以用于提交等操作

适用场景

频繁触发事件, 且可以合并处理

  1. 用户输入搜索
  2. 浏览器resize

curl

curl命令行模拟浏览器请求
浏览器中,右键单击,选择Copy => copy as cUrl ->在命令行中粘贴 -> curl 后需要加上i(Ctrl-a回到头部,加上i)

1
2
3
4
5
6
7
8
9
10
11
curl -i 'http://.../mt-sso' -H ...
HTTP/1.1 200 OK
Server: Tengine
Date: Fri, 01 Jun 2018 11:44:18 GMT
Content-Length: 0
Connection: keep-alive
Access-Control-Allow-Origin: *
Access-Control-Allow-Methods: POST,GET,PUT,PATCH,DELETE
Access-Control-Max-Age: 3600
Access-Control-Allow-Headers: x-requested-with
Access-Control-Allow-Credentials: true

修改Origin

1
2
3
4
5
6
7
8
9
10
11
curl -i 'http://..../mt-sso' -H 'Origin:www.baidu.com' -H
HTTP/1.1 200 OK
Server: Tengine
Date: Fri, 01 Jun 2018 11:45:26 GMT
Content-Length: 0
Connection: keep-alive
Access-Control-Allow-Origin: www.baidu.com
Access-Control-Allow-Methods: POST,GET,PUT,PATCH,DELETE
Access-Control-Max-Age: 3600
Access-Control-Allow-Headers: x-requested-with
Access-Control-Allow-Credentials: true

hexo + Github搭建自己的博客

  • 新建文章

    1
    hexo n (hexo new) [filename]
  • 部署到Github

    1
    2
    3
    hexo g (hexo generate) # 生成
    hexo s (hexo server) # 启动本地web服务器
    hexo d (hexo deploy)# 部署到Github
  • 插入本地图片
    图片可以放在文章目录中,文章的目录需要配置_config.yml文件,将post_asset_folder设置为true

    1
    post_asset_folder: true

执行命令 hexo new [filename],会在_posts文件夹中生成filename.md, filename文件夹, 将图片资源放到filename文件夹中,就可以在文章中引用。具体引用方式如下:

1
2
3
4
// 只在文章中显示
![](image.jpg)
// 在文章和首页中同时显示
{% asset_img image.jpe This is an image %}

参考文章:
https://yanyinhong.github.io/2017/05/02/How-to-insert-image-in-hexo-post/

python-array

数组切片

a[stop]
a[start:stop:step]

1
2
3
4
5
6
7
8
9
array = ['a', 'b', 'c']
array[0] // 'a'
array[-1] // 'c'
array[0:2] // ['a', 'b'] 默认步长1
array[::2] // ['a', 'c'] 从列表的头部开始每2个提取一个元素
array[::-2] // ['c', 'a'] 从列表的尾部开始提取,步长为2
array[::-1] // ['c', 'b', 'a'] 利用切片实现列表逆序
array[::] // ['a', 'b', 'c']
array[:] // ['a', 'b', 'c']

多维数组

1
2
3
4
5
6
7
8
9
10
11
12
13
14
15
16
17
18
19
20
21
22
23
import numpy as np
// array([[ 0, 1, 2, 3, 4, 5],
// [ 6, 7, 8, 9, 10, 11]])
a = np.arange(12).reshape(2, 6);
a[1,:] // array([ 6, 7, 8, 9, 10, 11])
a[1:2, 1:3] // array([[7, 8]])
// array([[ 0, 2, 4],
// [ 6, 8, 10]])
a[:, ::2]
a[:, 2:5] //
// array([[ 0, 1, 2, 3, 4, 5],
// [ 6, 7, 8, 9, 10, 11]])
a[:, :, :] //
a[1, :, :] //
a[1, ...] //
a[..., 1] //

python-matplotlib

  • Matplotlib
    是一个非常强大的Python画图工具
    1
    pip install matplotlib

使用时matplotlib是,macos会提示错误Python is not installed as a framework
解决方法:

1
2
3
在~/.matploglib/ 下新建文件matploglibrc
// matplotlibrc
backend: TkAgg

python-debug

  • pdb debug
    pdb是python自带的库,为python程序提供了交互式的代码调试库。
    明显的缺陷就是对于多线程,远程调试等支持得不够好,同时没有较为直观的界面显示,不太适合大型的 python 项目。而在较大的 python 项目中,这些调试需求比较常见,因此需要使用更为高级的调试工具。

c继续执行程序
l查看当前行的代码
s进入函数
q中止并退出
n执行下一行
p打印变量的值

1
python -m pdb test.py

调用pdb模块的set_trace方法设置一个断点,当程序运行自此时,将会暂停执行并打开pdb调试器。

1
2
3
4
5
import pdb
a = "a string"
pdb.set_trace()
(pdb) p a // 打印出a
(pdb)

  • pudb
1
pip install pudb // 安装pudb

machinelearing

机器学习就是把无序的数据转换为有用的信息,机器学习对任何需要解释并操作数据的领域都有所裨益。

  • 开发机器学习应用程序的步骤
  1. 收集数据
  2. 准备输入数据
  3. 分析输入数据
  4. 训练算法
  5. 测试算法
  6. 使用算法

thrift

##
内网服务间API调用http协议,请求路径长且重度依赖DNS+MGW+Nginx,存在单点风险。业务核心链路上大面积依赖DNS+MGW+Nginx,对服务的可用性带来巨大隐患。
http请求效率比不上thrift

用脚本编译thrift文件

1
./genthrift.sh
  • 编译过程报错,需要后端修改IDL文件
1
2
thrift特殊处理int64 long行数字
http接口处理特殊long型数字

python-numpy

  • zeros(shape)

    1
    2
    3
    4
    5
    6
    7
    import numpy as np
    a = np.zeros(2); // array([0., 0.])
    a = np.zeros((2, 2))
    // array([[0., 0.],
    // [0., 0.]])
  • tile(A, dep)
    在各个维度上重复A
    如果A的维度< dep的维度,需要对A增加维度
    tile(A, (a, b, c, d))
    对数组A最深层的维度重复d次,数组A往外一层,重复c次,如A维度不够,增加维度,依次递推。

    1
    2
    3
    4
    5
    6
    7
    8
    9
    10
    11
    >>> a = np.array([0, 1, 2])
    >>> np.tile(a, 2)
    array([0, 1, 2, 0, 1, 2])
    >>> a = np.array([0, 1, 2])
    >>> np.tile(a, (2, 2))
    array([[0, 1, 2, 0, 1, 2], [0, 1, 2, 0, 1, 2]])
    >>> a = np.array([0, 1, 2])
    >>> np.tile(a, (2, 2, 2))
    array([[[0, 1, 2, 0, 1, 2], [0, 1, 2, 0, 1, 2]],[[0, 1, 2, 0, 1, 2], [0, 1, 2, 0, 1, 2]]])